
It’s pretty simple and the result is delicious!
Summer is here, and that means the best season to enjoy ice cream is too! And while store-bought ice cream is always a treat, sometimes you want to enjoy the process of making it at home. That’s why, when we discovered a recipe for making ice cream without a freezer, we had to head to the SoraKitchen and give it a try. It turns out it isn’t that hard, it just requires knowledge of science and a little elbow grease.
We found the recipe on the website of popular Japanese food distributor and ice cream manufacturer Meiji, where we also learned to how to make edible slime. It’s a simple recipe made with very few ingredients, and we couldn’t wait to try our hand at it.
Ingredients
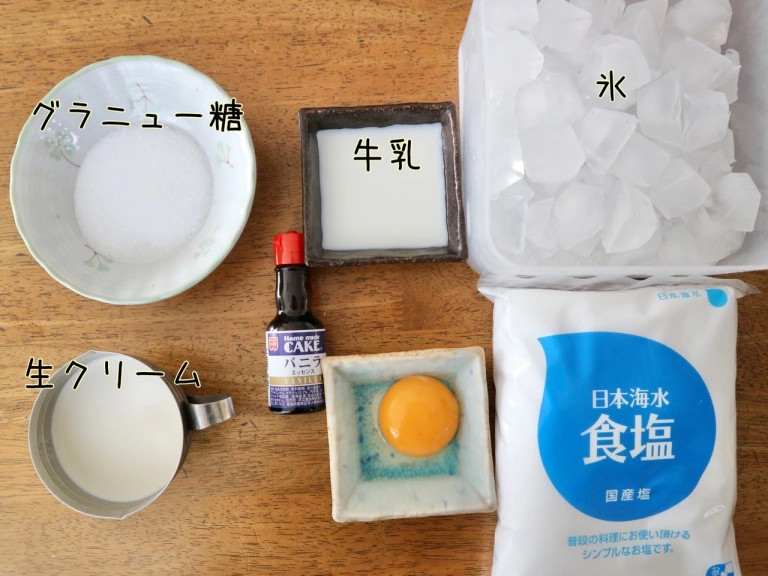
1 egg
30 grams (1.1 ounces) of granulated sugar
3 tablespoons of milk
100 milliliters of heavy cream
A small amount of vanilla essence
300 grams (10.6 ounces) of salt
1 kilogram (2.2 pounds) of ice cubes
As far as equipment goes, you’ll also need:
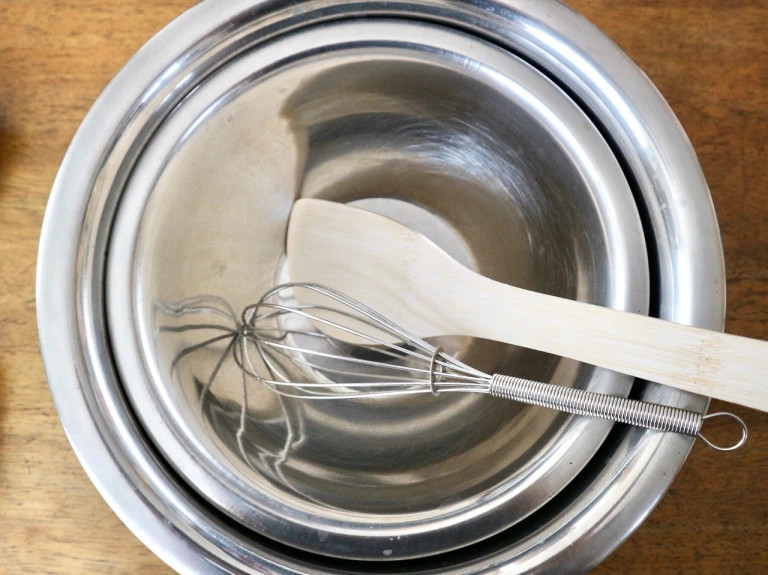
2 bowls, one large and one small
A whisk
A wooden spatula
The large bowl needs to be quite a bit bigger than the smaller bowl. Ideally, when stacked together, you’ll want there to be a gap of 5 to 6 centimeters (2 to 2.4 inches) between their rims, but as long as there’s a decent size difference, it’s okay. You’ll also want a small bowl that easily transfers temperature, like the stainless steel one we’re using.
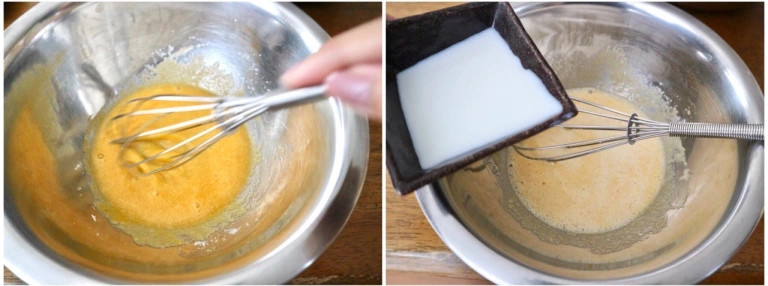
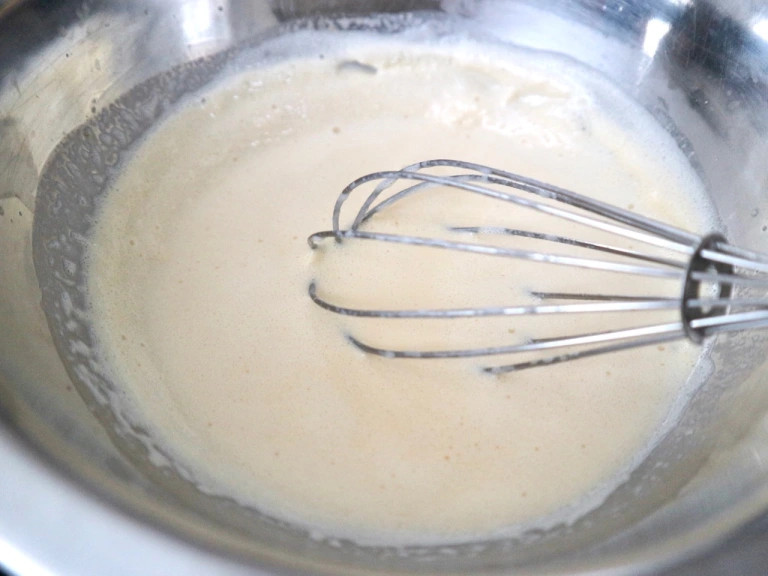
The first step in making the ice cream is to crack open the eggs in the small bowl, then add the sugar and whisk until the mixture becomes a milky yellow color. Then, add in the milk a little at a time, whisking all the while.
In the big bowl, add a ratio of three parts ice to one part salt. You won’t use all the ice and salt right away, so put the remainder aside for later.
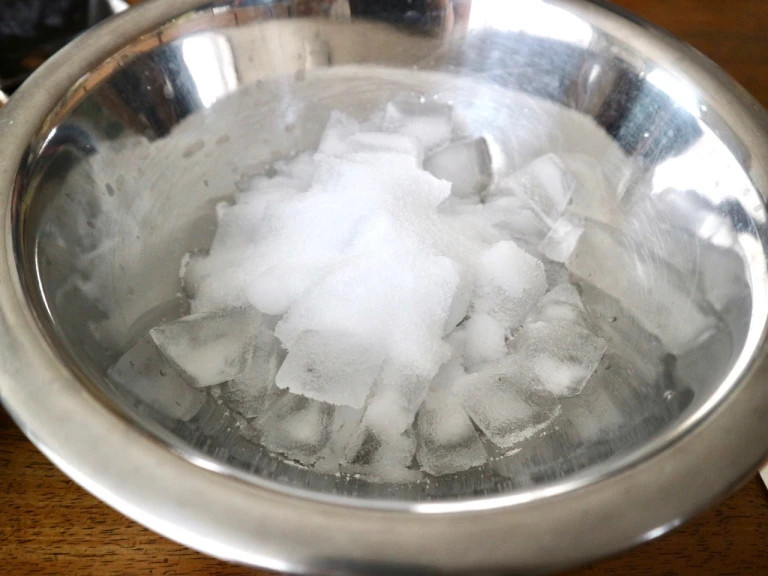
Place the small bowl with the egg mixture on top of the salted ice in the large bowl, then add the heavy cream and vanilla essence and whisk again.

At this point, the ice cream is supposed to solidify after a while, so we were pretty excited, wondering how long it would take. But we whisked and whisked for ten straight minutes and it showed no signs of firming up.

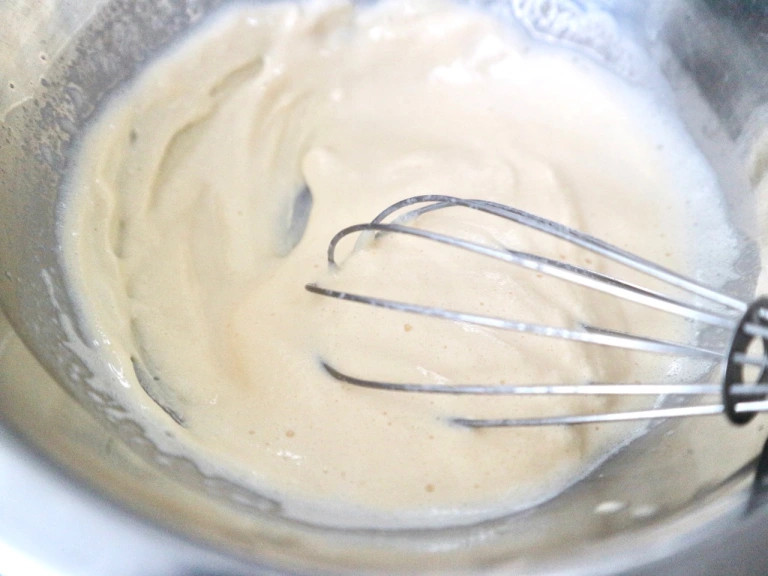
Worried we messed up somewhere, we checked the big bowl, added some more ice and salt, and then diligently whisked for another five minutes until…
…the contents in the bottom of the bowl began to solidify!
With a little more mixing, the whole substance took on the texture of soft-serve ice cream.
This was the point where we switched from the whisk to the wooden spoon and began to mix the solution, making sure to scoop from the bottom up. The movement steadily became more and more difficult…
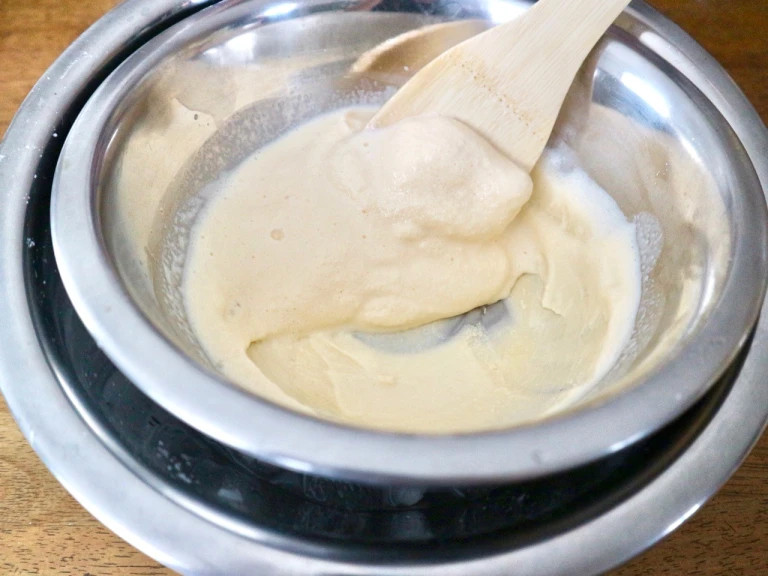
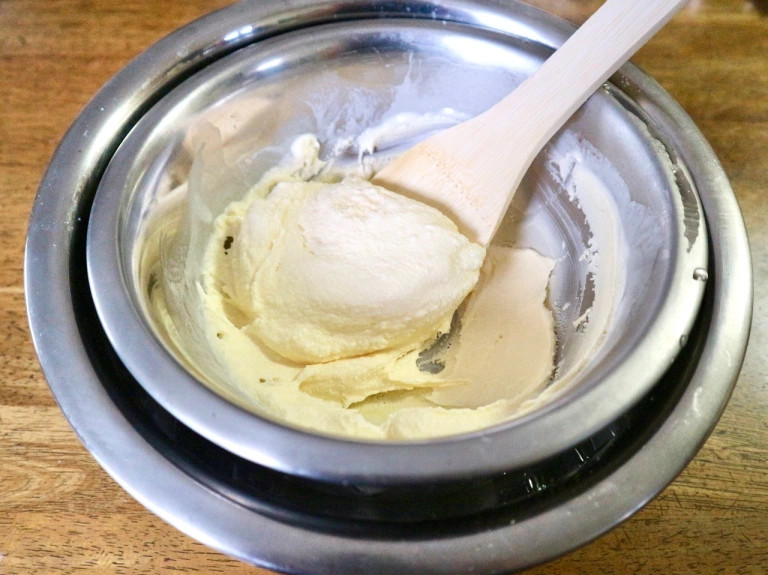
Until the consistency thickened to something a bit firmer than soft-serve ice cream and it was ready!
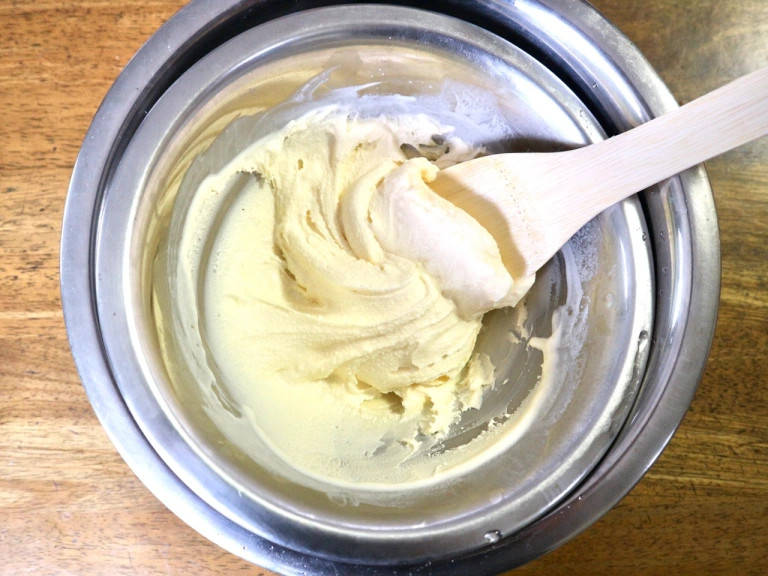
Altogether it took about 30 minutes of mixing, so it was pretty tough, but seeing the finished product gave us a wonderful sense of accomplishment.
For the sake of interest, after removing the small bowl, we chanced touching the salted ice. It was shockingly cold. According to Meiji’s website, as ice melts, it lowers the temperature of the things around it. The addition of salt makes the ice melt faster, creating water that’s less than 0 degrees Celsius (32 degrees Fahrenheit), which makes the bottom of the bowl cold enough to firm up the ice cream.
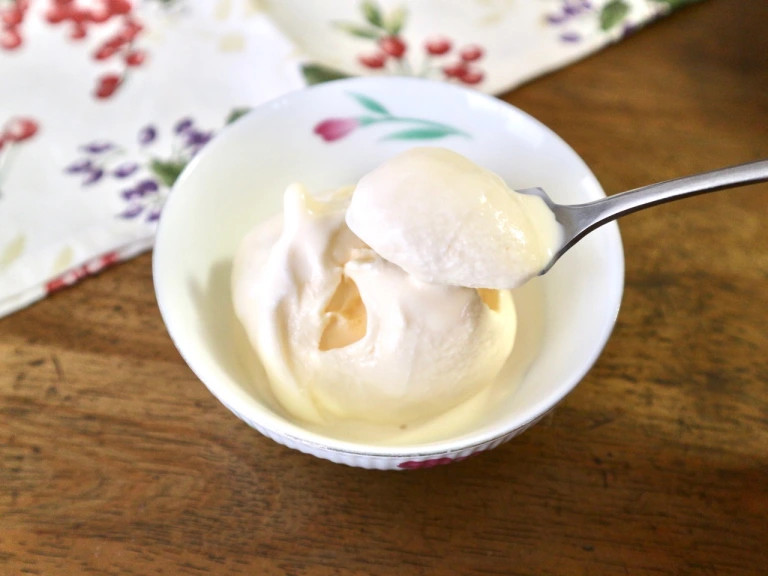
Though our homemade ice cream required a good amount of muscle, it was really interesting to observe the mysterious process of turning sugar, eggs, milk, and cream into ice cream! But now it was time to taste it.

The heavy cream made it super rich, and it was delicious in a way that homemade dishes always are!
We were so puffed up by our sense of accomplishment that we might have even said it was good competition for luxury ice cream sold at the store. We were singing our own praises, of course, but our homemade ice cream was definitely delicious and highly satisfying.
It made us think of ways we could use it. It’d be a waste to use it in a French toast hack, but as a topping…Yum! Or together with a freshly toasted Mister Donut donut…We can’t wait to combine it with other recipes!
Source: Meiji
Images © SoraNews24
● Want to hear about SoraNews24’s latest articles as soon as they’re published? Follow us on Facebook and Twitter!
[ Read in Japanese ]
 This French toast recipe that uses ice cream will knock your pajamas off【SoraKitchen】
 We try making red-bean rice using an ice cream bar【SoraKitchen】
 How to make self-isolation tiramisu with simple ingredients【SoraKitchen】
 Frozen marshmallow cream: Just two ingredients, at least as good as ice cream 【RocketKitchen】
 How to make cheese with just three ingredients【SoraKitchen】
 Tokyo subway installing new ticket gates that don’t accept payment through Suica or other IC cards
 Japanese Shinkansen becomes an overnight hotel for three nights this summer
 Face lettuce appears in Japan, with the face of Death Note’s Light Yagami, but why?
 Giant Evangelion Spear of Longinus to be installed at Japanese train station with Eva art trains
 Starbucks Japan releases a miniature display rack so you can create your very own store at home
 Japanese Coo-Che becomes a viral sensation, and everyone wants a taste
 Dance with demons in Kyoto at this Edo-period Japanese Halloween festival
 Why is Taco Bell failing in Japan, even as the country falls in love with tacos?
 Universal Studios Japan requiring consent form for adults-only horror attraction
 New Shinkansen luggage drop-off system begins in Japan, making train travel even easier
 Japan now has human refrigerators inspired by Japanese vending machines
 Studio Ghibli releases anime T-shirts that pay homage to one of Hayao Miyazaki’s most personal films
 Hatsune Miku collaborates with Hokusai’s art in new Vocaloid ukiyo-e illustration series [Pics]
 99-year-old woman rescued while attempting to climb Mt. Fuji
 Japanese convenience store releases Japanese convenience store-flavor fried chicken
 Which country’s foreign tourists spend the most money per-person in Japan? Hint: Not the U..S. or China
 Family Mart’s new Tokyo flagship convenience store doesn’t feel convenient, but is that a problem?
 Studio Ghibli has a new anime out, and there’s only one place in the world where you can see it
 Salomon releases Japan-exclusive Mt. Fuji hiking gear that doubles as an amazing souvenir
 Japan triples departure tax, foreign tourists and locals now must pay more to leave country
 Family Mart opens new “Famima” flagship store in Tokyo that’s like a tourist attraction
 Sanrio Character Poll announces winners, Hello Kitty absent from top 10 in many countries
 Japan announces sudden 400-percent increase in visa fees for foreigners entering the country
 Japan’s human washing machines will go on sale to general public, demos to be held in Tokyo
 Starbucks Japan releases new drinkware and goods for Valentine’s Day
 Starbucks Japan releases new sakura goods and drinkware for cherry blossom season 2026
 Japan’s newest Shinkansen has no seats…or passengers [Video]
 Japanese ninja certification exam attracts 131 candidates from Japan and abroad
 Put sesame oil in your coffee? Japanese maker says it’s the best way to start your day【Taste test】
 Exploring the tastes and textures of Forbidden Yukimi Toast【SoraKitchen】
 It doesn’t get any fresher than raw-egg pudding!【SoraKitchen】
 Experiment: Can you make good matcha lattes by melting green tea ice cream?【SoraKitchen】
 How to turn McDonald’s chicken nuggets into tasty katsudon in five minutes【SoraKitchen】
 We can’t stop eating this chicken ramen noodle and chocolate snack we made【SoraKitchen】
 Got a hankering for hanpen? Here’s how to make your own Japanese fish cakes【SoraKitchen】
 How to make Tokyo Disneyland’s awesome Mickey Mouse eggs at home!【SoraKitchen】
 Leftover sushi? A popular manga suggests making it into fried rice【SoraKitchen】
 How to make Disney’s Chocolate Peanut Butter Banana French toast at home【SoraKitchen】
 We try making a low-calorie katsu with tofu instead of pork【SoraKitchen】
 Japanese restaurant chain shows us how to make katsudon in three minutes【SoraKitchen】
 Don’t throw away your leftover ramen broth! Use it to make ice cream sauce instead!【Recipe】
 TikTok food trend: How to make soft, pillowy Cloud Bread 【SoraKitchen】
 We make an easy, cheap variation of an Eel Kabayaki Bowl that’s also vegetarian!【SoraKitchen】
 How to use leftover Japanese curry: We test out a recipe for curry bread quiche【SoraKitchen】