
Clever, quick, and easy idea lets you create one-of-a-kind anime art.
Acrylic figure stands have become one of the most popular types of anime character goods in Japan these days, and the appeal is easy to see. They’re less intrusive on the overall atmosphere of a room than a poster, and also more compact and stable than a figure, making them easy to put on the corner of your desk so you can have your favorite character keep you company as you work or study.
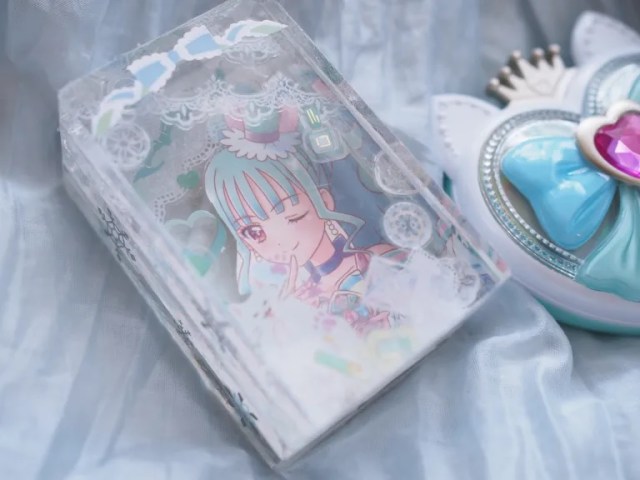
For example, look at this acrylic art block for Mayu Nekoyashiki, a.k.a. Cure Lillian, from the Wonderful Pretty Cure arc of magical girl series PreCure. It’s both cute and elegant, with the sense of depth providing an especially artistic touch.

If you’re thinking you haven’t seen this particular piece of merch for sale, though, that’s because we made it ourselves! Not only that, we were able to get everything we needed at the 100 yen shop (Daiso, specifically) and didn’t need to use any specialized tools whatsoever.
Let’s walk through the steps of this currently buzzing social media trend among anime and idol fans in Japan.
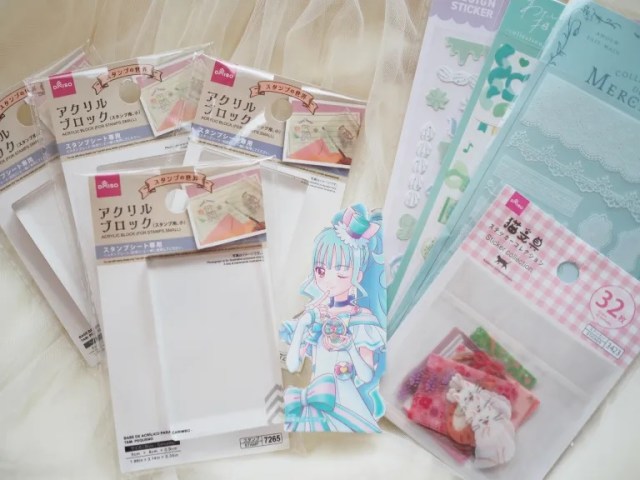
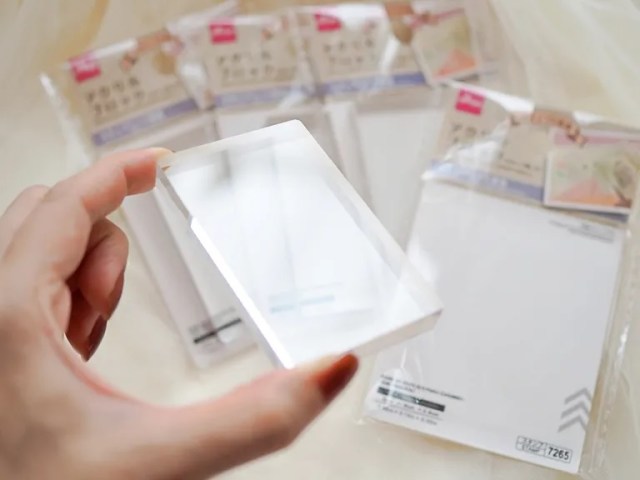
First, you’ll need a picture of the character who’s your muse (we cut out a picture of Cure Lillian from the packaging of some PreCure merch we had). Then you’ll need a few clear acrylic blocks, so we picked up four of them at Daiso. You’ll also want some stickers, preferably something that matches the image colors of the character or fits the aesthetic atmosphere of their series (we got these at Daiso too, in their stationery section). Finally, you’ll need both double-sided and clear single-sided tape.
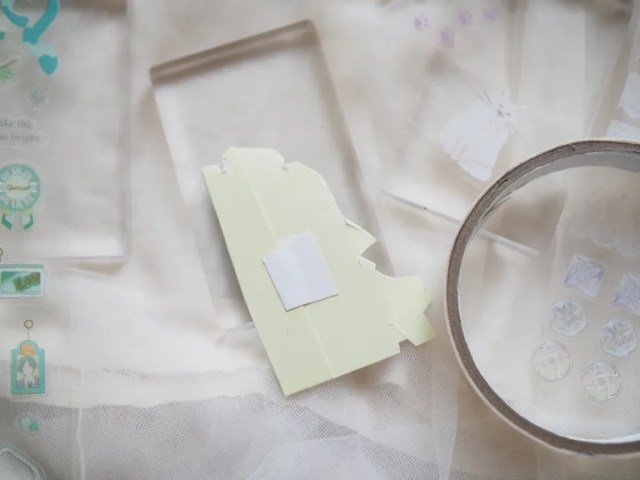
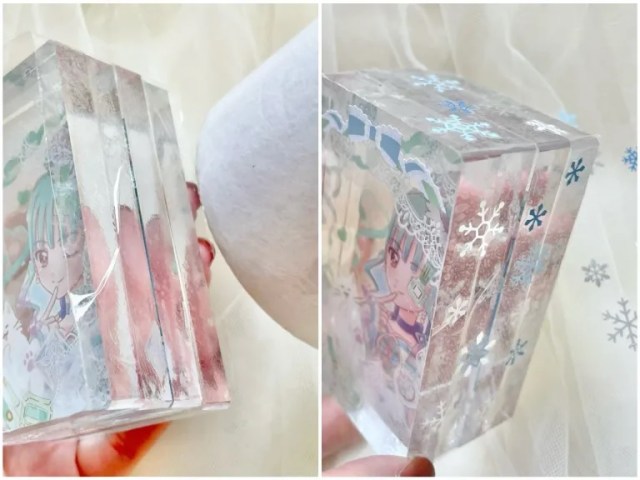
There’s something oddly satisfying about the pristine clarity of the acrylic blocks, so it took just a little bit of determination for us to get started with the first step, using the double-sided tape to attach the character’s picture to the surface of a block.
▼ This is, by the way, all the double-sided tape you’ll need to use.

Now it’s time to create the foreground and background layers for that sense of depth. One by one, we added the stickers, setting the block we were working on either above or beneath the others to see how the stickers were stacking visually, while keeping a few of them in reserve for a reason we’ll get to a little later on.

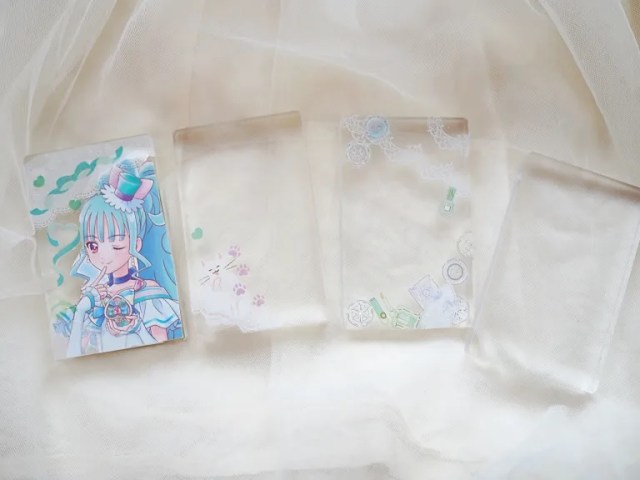
Once you have all the layers set it’s time to stack all the blocks in the sequence you want (we opted to place Cure Lillian second from the bottom). Then, using the single-sided clear tape, preferably some strong, sturdy packing tape, wrap the blocks together.
This is where the stickers you have left over come into play. If after tapping the blocks together you have any unwanted gaps or unsightly tape bunching, you can use stickers to cover them.
And with that, your acrylic art block is finished!

If you want a more compact design, you could get away with using as few as just two blocks. Using at least three, though, really gives the character some extra presence by allowing for both foreground and background layers, and the extra thickness helps catch the light from various angles for a sparkly effect that feels especially appropriate for your favorite character, like they’re giving off a sparkly aura.

So with an investment of just a couple hundred yen and a little bit of time, you’ve got a beautiful, one-of-a-kind expression of your fandom, and we won’t be surprised if we start seeing these on a lot more desks around the office soon.
Photos ©SoraNews24
● Want to hear about SoraNews24’s latest articles as soon as they’re published? Follow us on Facebook and Twitter!
[ Read in Japanese ]
 Daiso DIY dessert! 100 yen store’s super-easy mochi sweets kit is our new hero
 64 Sanrio characters, decades of kawaii culture history all on one cup from 100-yen store Daiso!【Pics】
 How to make a super simple, super cheap, no-floorspace Christmas tree with stuff from Daiso
 100 yen store chain Daiso opens online shop with 30,000 items to choose from!
 A visit to the largest Daiso 100 yen shop in all Japan【Photos】
 Wisteria season starts early with blooming of Japan’s Great Wisteria in its beautiful garden
 Japanese bento shop sells croquettes for 13 cents, but are they any good?
 First Shiba Inu police dog in Japan’s Gifu Prefecture now on duty[Video]
 Japan has new rules for bicycle riders, and these 14 things could get you a fine or a court date
 Final version of Sanrio: Beginning of Kawaii exhibition opens in Tokyo[Photos]
 Japan’s best conveyor belt sushi restaurant of seven years ago has now, finally, come to Tokyo
 Japanese government wants overseas anime market to roughly triple in 10 years, but are they crazy?
 New Japanese-made Godzilla movie announced, looks to be first direct sequel since 1999
 Yoshinoya invites you to give the gift of beef bowls this Mother’s Day
 New Travelling Bento pouches turn your luggage into a Japanese lunch box
 Japan reportedly adding Japanese language skill requirement to most common foreigner work visa
 Mt. Fuji decorated with a 500,000-flower pink carpet is Japan’s ultimate spring view
 Lawson convenience store at popular tourist site is one of the most unusual in Japan
 Japanese trains in Sapporo might be better than those in Tokyo, thanks to one special feature
 30 Pikachus want to share a Tokyo hotel room with you that has separate Grass, Water, Fire spaces
 Man bites woman at cherry blossom park in Japan, dies shortly after
 Starbucks Japan releases FIVE new Frappuccinos in a day, and we try them all in 90 minutes
 Howl’s Moving Castle’s scene-stealing dog is here to clean your home as a plushie mop
 Pokémon and Ikea Japan cross over into each other’s worlds with collaboration events
 Japan now has a special desk for people who work at home with a pet cat[Photos]
 Famous Tokyo cherry blossom spot installs view-blocking screens to fight overcrowding[Video]
 Uniqlo announces new T-shirts for One Piece, Naruto and more for manga publisher’s 100th birthday
 Train station platform ramen store closes its doors on half a century of history in Tokyo
 Starbucks Japan releases new My Fruit³ Frappuccino at only 34 stores around the country
 Krispy Kreme releases Super Mario doughnuts in Japan for a limited time
 Survey asks foreign tourists what bothered them in Japan, more than half gave same answer
 Japan’s human washing machines will go on sale to general public, demos to be held in Tokyo
 Starbucks Japan releases new drinkware and goods for Valentine’s Day
 We deeply regret going into this tunnel on our walk in the mountains of Japan
 Starbucks Japan releases new sakura goods and drinkware for cherry blossom season 2026
 Studio Ghibli releases Kodama forest spirits from Princess Mononoke to light up your home
 Japan’s newest Shinkansen has no seats…or passengers [Video]
 Major Japanese hotel chain says reservations via overseas booking sites may not be valid
 Put sesame oil in your coffee? Japanese maker says it’s the best way to start your day【Taste test】
 No more using real katana for tourism activities, Japan’s National Police Agency says
 If you were naked in a Daiso 100 yen store, could you put together an entire outfit? We find out
 100-yen store Daiso teaches us how to make our own cloth face masks
 Japan’s Twitterers show off more clever ways to transform 100-yen store items
 Are 100-yen shop Daiso’s gel nail polish strips a good dupe for salon quality nails? Let’s find out
 Seiji cosplays as the hot new mascot Myaku-Myaku using only 100-yen products
 Crazy cheap cosplay at Daiso? How to transform into Dragon Ball’s Vegeta at the discount shop
 Why are young Japanese women going crazy for this 100-yen Daiso wristwatch?
 Gundam model enthusiast turns plain smartphone case into amazing work of art
 Seiji gets into the Olympic spirit on the cheap at 100-yen store Daiso
 Six awesome travel goods you can find at 100 yen shop Daiso!
 Daiso wine, the super cheap vino from Japan’s largest chain of 100-yen stores 【Taste test】
 What’s the best way to spend 1,000 yen at Daiso Japan?
 Can you buy everything you need for an overnight camping trip at Daiso? Part 2!【Photos】
 Does this egg timer from Japanese 100-yen store Daiso really work?
 We test the cleaning power of the miniature washing machine from 100 yen shop Daiso