

Today in the SoraKitchen, we’re not just making umeboshi, we’re making umeboshi inside our office.
SoraNews24’s HQ in downtown Tokyo’s Shinjuku neighborhood is made up of two rooms. There’s the main room, where our in-office staff writes articles, and the conference room, which is used for meetings, interviews, and making pickles.
That last one is a recently addition to the conference room activity list, courtesy of our Japanese-language reporter Go Hatori…but really courtesy of Go’s grandpa and grandma. A few years back, Go’s grandparents taught him their recipe for making umeboshi, Japanese-style pickled plums.
Summer is the season for making umeboshi, and Go tried his hand at it for the first time in 2021. The results, he says, were less than delicious, and his plums turned out slightly, but not much, better in 2022. 2023 was a breakthrough, though, as Go managed to produce a truly tasty bath of umeboshi, and even his grandpa was impressed when he tasted Go’s work.
▼ Go’s granddad with a whole bunch of umeboshi

Sadly, Go’s grandpa passed away in 2024, and our reporter took that year off from umeboshi making. He’s ready to try again, though, not just because he likes umeboshi, but also as a way of keeping his connection with his grandpa through his pickling legacy.
But why is Go making his umeboshi in the office? Because he’s having construction work done on his apartment balcony this summer and he won’t have anywhere to hang the plums to dry (the final step of the process). He’ll need to make periodic adjustments to the batch, so doing his pickling at the SoraHouse, way off in the mountains of Saitama Prefecture, won’t work.
That leaves making pickles at the office as the best option, and that also means that we get a front-row seat to the process, so even those of us without a Japanese grandpa or grannie of our own can learn how to make umeboshi too. From start to finish, it takes several weeks to make umeboshi, so today Go will be showing us the initial steps, and we’ll check in with him again when it’s time for the next stage.
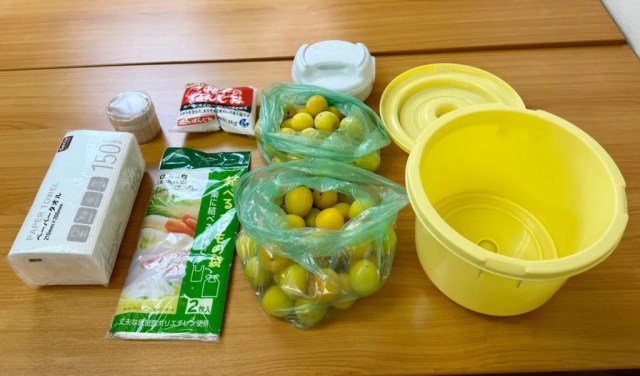
What supplies do we need at the starting stage? Japanese plums, or ume, as they’re called in Japanese, are first on the list, naturally. Next we’ll need coarse-grain salt (we’ll explain the exact quantities below). A toothpick and paper towels will come in handy, but those are things you probably have in your kitchen already and won’t need to make a special shopping run for.
We’re also going to need a container to keep the plums in as they pickle. While you could possibly get away with any old bucket, Go recommends getting a specialized pickling bucket, which has two lids. Amazon Japan has a bunch here, with several available for about 1,000 yen (US$7]. He suggests getting a “pickling stone” too, which is a fancy name for a weight designed to sit on top of the pickling bucket’s inner lid and keep it firmly clamped down. Again, you could probably use any suitably disc-shaped heavy object, but you can get a pickling stone from Amazon Japan for 2,000 yen or less, so Go thinks it’s a worthwhile investment. And last, Go strongly recommends getting a pickling bag that can be tied up to protect the plums during the process, and once again, you can get them from Amazon Japan, with Go’s preferred brand being about 500 yen for a set of two bags.
And with that, it’s time to get started making some umeboshi!
● Step 1
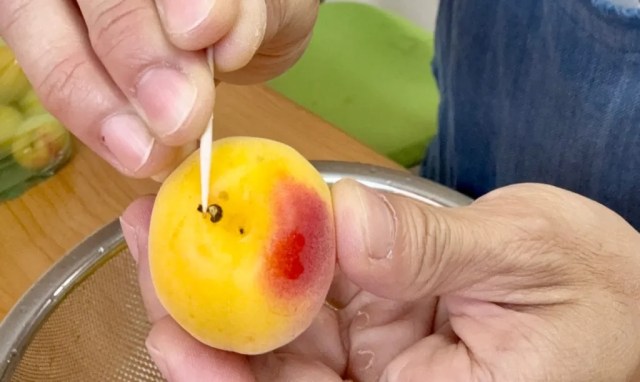
The first thing to do is to remove the stems from each of the plums. This is where the toothpick will come in handy, since it’ll allow you to dig the stem out without slicing up the rest of the fruit.
● Step 2
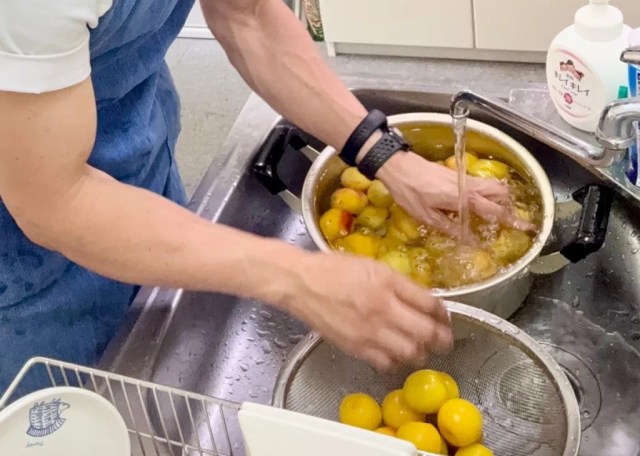
Wash the plums in cold water to remove any dirt or debris.
● Step 3
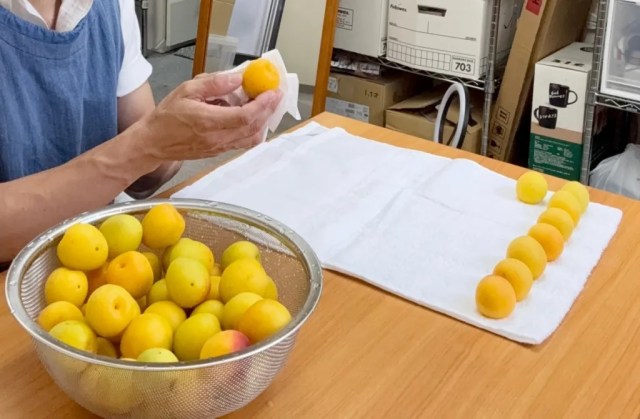
Dry the plums using a paper towel.
● Step 4

Now let’s talk about the quantities of plums and salt to use. For the plums, you can use as many or as few as you want, of course, but just make sure you weight them, because Go’s grandpa’s recipe ratio calls for an amount of salt equal to 15 percent of the total weight of the plums. So, for example, if you had two kilograms (4.4 pounds) of plums, you’d use 300 grams (10.6 ounces) of salt. For Go’s batch of office umeboshi, he’s got 1.89 kilograms of plums, so he measured out 284 grams of salt.
● Step 5
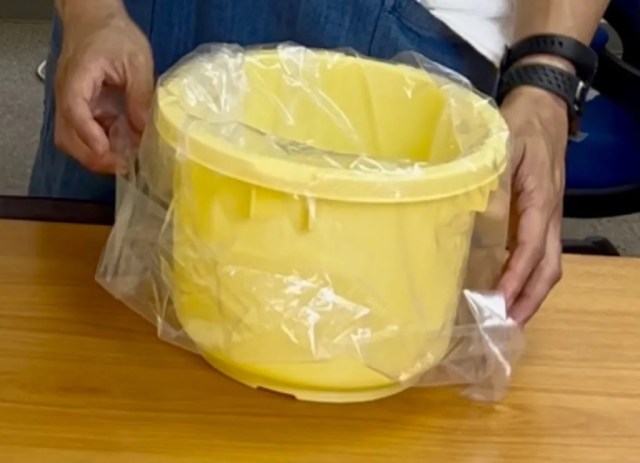
Place the pickling bag inside the pickling bucket. Really, this is a failsafe step, but the extra layer of the pickling bag will help keep things secure and hygienic during the pickling process.
● Step 6
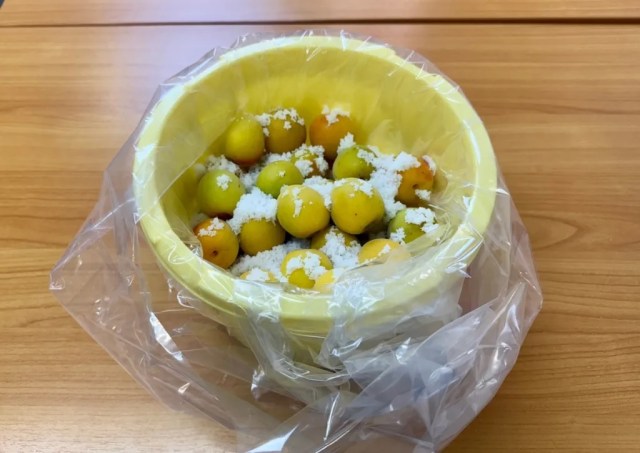
Place the plums and salt in the pickling bucket. Start with a layer of plums, sprinkle salt over them, then add another plum layer, then more salt, and keep going until you’ve got all of your ingredients in there.
● Step 7
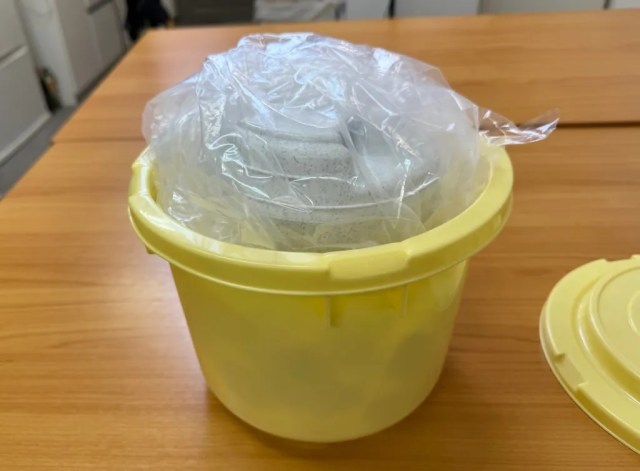
Tie the pickling bag closed and place the pickling bucket’s inner lid on top of it, and then place the pickling stone on top of that, and then put the bucket’s outer lid in place.
● Step 8
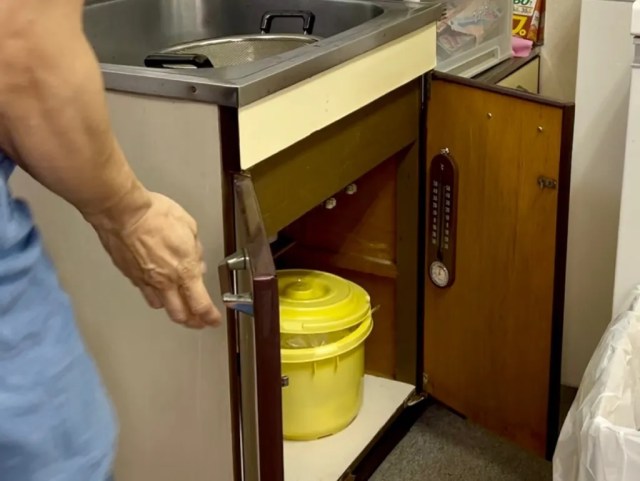
Place the pickling bucket in a dark, cool place. Oh, and if you’re making your pickles at work, you’ll probably also want to make sure it’s somewhere so that the container won’t be in the way while you and your officemates are working.
And with that, we’ve completed Stage 1 of Operation Make Go’s Grandpa’s Umeboshi. We’ve got about two weeks until Stage 2, so like our pickled plums stay cool, and we’ll see you back here then.
Photos ©SoraNews24
● Want to hear about SoraNews24’s latest articles as soon as they’re published? Follow us on Facebook and Twitter!
 How to make epic umeboshi like a Japanese grandpa
 Our authentic, homemade red pickled ginger triumphs over store-bought versions【SoraKitchen】
 Now’s your once-in-12-years chance to order this special $850 pot of pickled plums!
 Pizza Hut Japan creates Japanese plum pizza, calls it a “Japanese Margherita”【Photos】
 Pizza Hut Japan’s pickled plum pizza is mercilessly aware of what it is【Taste test】
 Japanese ninja certification exam attracts 131 candidates from Japan and abroad
 Studio Ghibli store Donguri Republic announces opening of first-ever store in America
 Japanese sweets brand creates new drinkable Cigare and we’re totally here for it
 Starbucks Japan releases new Frappuccino, tea and soda drinks for summer
 7-Eleven Japan to start selling Vietnamese banh mi sandwiches this summer
 Japanese sweets shop sells an ohagi so exquisite it sells out by noon
 Ginza Happo: One of Tokyo’s best all-you-can-eat seafood restaurants is an extreme buffet affair
 Forget Tokyo go-karts – there’s a new way to sightsee on four wheels in Japan
 Harajuku Custom Icees come to help Tokyo’s Takeshita Street stay cute and cool this summer
 Studio Ghibli adds new My Neighbour Totoro music box to its anime merchandise store in Japan
 New Japanese overnight train coming to connect Tokyo with Tohoku in sleep-travel style
 Universal Studios Japan is giving Frieren anime fans the chance to make unforgettable memories.
 Tokyo’s life-size Gundam is getting a new look before its end-of-summer removal
 Starbucks Japan releases new limited-edition summer drinks…and a pastry for dunking
 Japanese bento shop touches hearts by selling super cheap boxed lunches for around a dollar
 Uniqlo reveals third round of massive 100-year-anniversary manga T-shirts for Jump’s Shueisha
 Even at twice regular Daiso price, this handy item is still great for summer travel in Japan
 New official Ghibli anime food cookbook will teach you how to make Ponyo’s ramen and more
 Japanese convenience store Lawson launches new “mini supermarket” chain, L Minimart
 Japan’s real-world Pokémon hot spring’s first photos are here![Photos]
 Kyoto public junior high school becomes first in Japan with a hoodie school uniform
 Japan’s human washing machines will go on sale to general public, demos to be held in Tokyo
 Starbucks Japan releases new drinkware and goods for Valentine’s Day
 We deeply regret going into this tunnel on our walk in the mountains of Japan
 Starbucks Japan releases new sakura goods and drinkware for cherry blossom season 2026
 Japan’s newest Shinkansen has no seats…or passengers [Video]
 Put sesame oil in your coffee? Japanese maker says it’s the best way to start your day【Taste test】
 Japan reportedly adding Japanese language skill requirement to most common foreigner work visa
 Japan’s 5.3 million beautiful Hitachi Nemophila flowers are now in full bloom[Photos]
 Pokémon and Ikea Japan cross over into each other’s worlds with collaboration events
 Wisteria season starts early with blooming of Japan’s Great Wisteria in its beautiful garden
 Japanese salted plum industry in dire straits, according to umeboshi company’s tweet
 How to make no-rice “fried rice”【SoraKitchen】
 Japan creates Umeboshi Pickled Plum and Takuan Pickled Radish colas to pair with rice dishes
 We make nori seaweed mayo toast, just like Mama Hatori used to make!【SoraKitchen】
 We trick an online scammer into teaching us how to cook the best fried rice we’ve ever made
 How to make a “curry rice bowl” using instant oatmeal instead of rice 【SoraKitchen】
 How to make a massive deep dish Chicago Pizza…in your rice cooker
 Easy yet tasty instant miso soup ball recipe will help you clear out your kitchen【SoraKitchen】
 How to make an awesome Japanese summer dessert using only things you can buy at Daiso【SoraKitchen】
 Put a unique twist on your oatmeal by turning it into some Japanese comfort food
 Got a hankering for hanpen? Here’s how to make your own Japanese fish cakes【SoraKitchen】
 How to make cheese with just three ingredients【SoraKitchen】
 Rice ball melon bread – A treat Japanese bakeries aren’t crazy enough to make, but we are【SoraKitchen】
 How to make a massive five-layer lasagna…in your rice cooker【SoraKitchen】
 We recreate the KFC-Kenya-exclusive Nyama Nyama Burger in Japan【SoraKitchen】
 How to make so, Japan’s 1,000-year-old dessert recipe that’s back in fashion【SoraKitchen】
 Anime cooking in real life – How to make Food Wars’ unagi matelote【SoraKitchen】