

Have you got what it takes to dig your own private well? Well, to be honest, the thought has never really crossed our minds before, but after watching this video we’ve sure been inspired to try (sounds like a good summer project for Mr. Sato). We’ve also learned that well-digging is not for the faint of heart. Here’s the video journal of one man’s long journey to create a well in his backyard over the course of a summer. His adventure was full of ups and downs and many frustrating moments, but the end result was worth all of the trouble, not to mention making surprisingly interesting watching. Join us after the jump for a slideshow of this strenuous undertaking!
The man who dug a well by himself uploaded a video of the entire process on popular Japanese video-sharing site Niconico. Here’s his full video, set to some trippy Vocaloid background music:
We took screenshots of all of the photo slides and translated his comments below. Sit back, relax, and enjoy the show!
He begins the slideshow with the ominous introductory line, “The summer that the water bill was over 30,000 yen.”
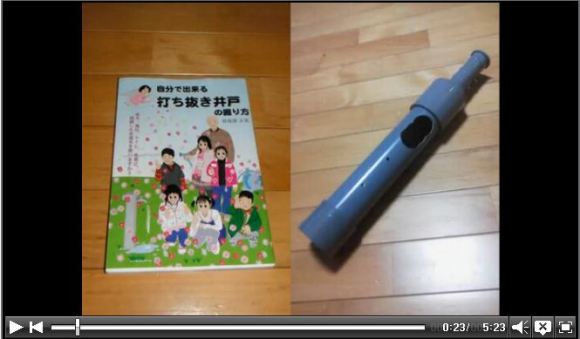
I got the idea to build a well in my garden. I found a book called “Do it yourself: How to dig a well” on Masami Sokabe’s homepage. That same day I ordered the book and necessary materials. This video documents the process and hardships that I underwent over the one year it took to complete my well.
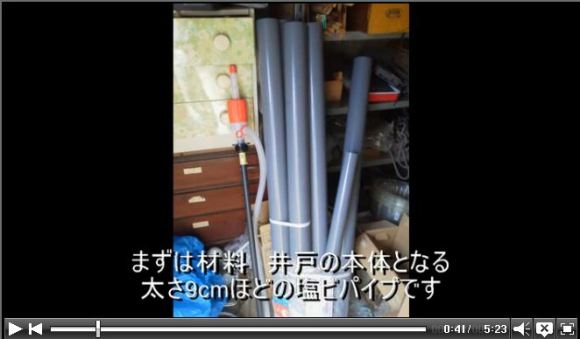
▼First, the materials. These 9-cm (in diameter) polyvinyl chloride (PVC) pipes will become the main structure of the well.
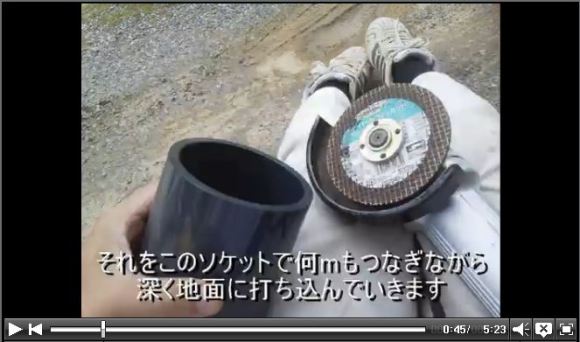
▼Connect the sockets together as you go, you will pound several meters’ worth of them deeply into the ground.
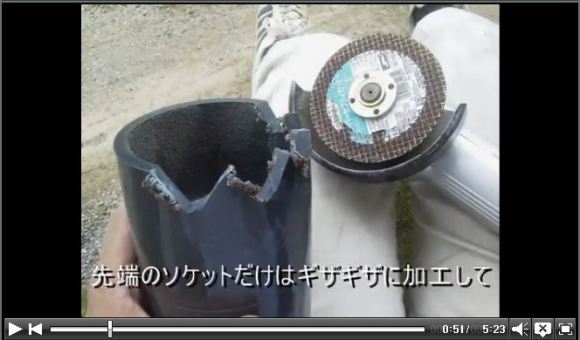
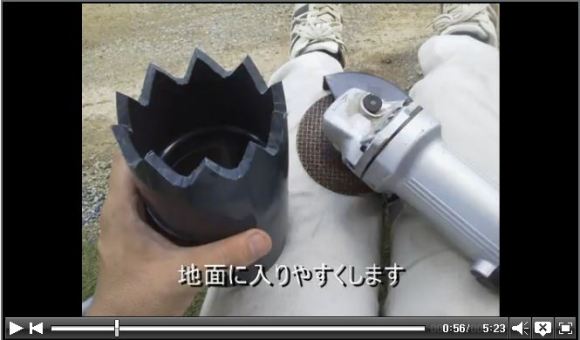
▼Sharpen the edge of only the first pipe so that it becomes jagged.
▼That will make it easier to drive into the ground.
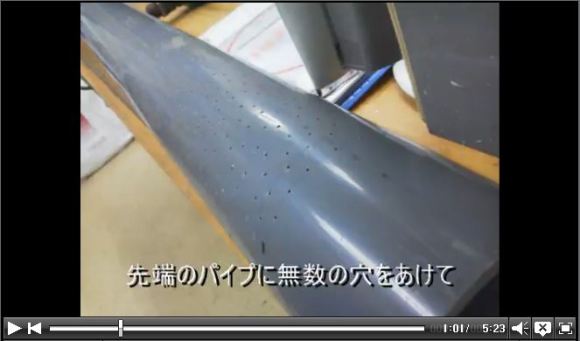
▼Open countless little holes in the first pipe.
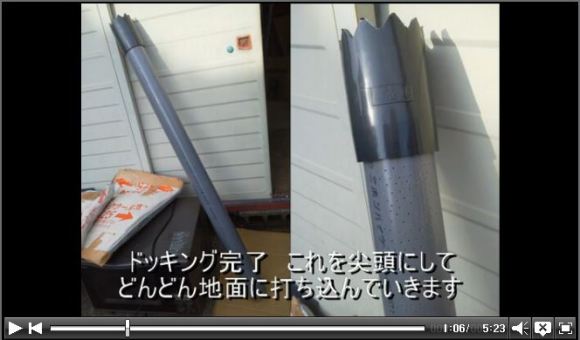
▼The docking pipe is now finished. You will gradually pound it pointy-end first into the ground.
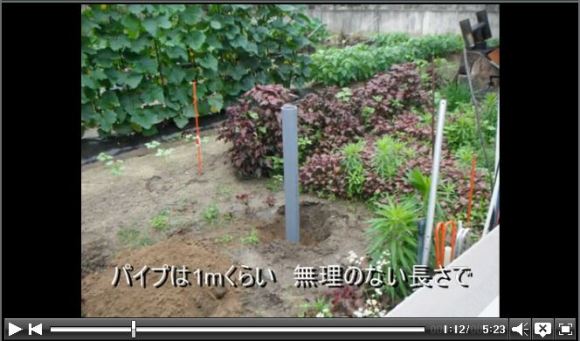
▼The pipe is about one meter long, a reasonable length.
▼Hang cinder block weights from the pipe.
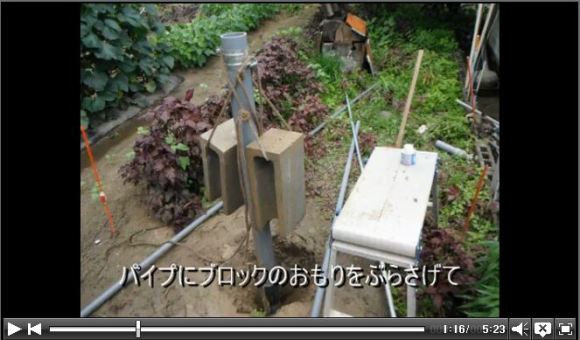
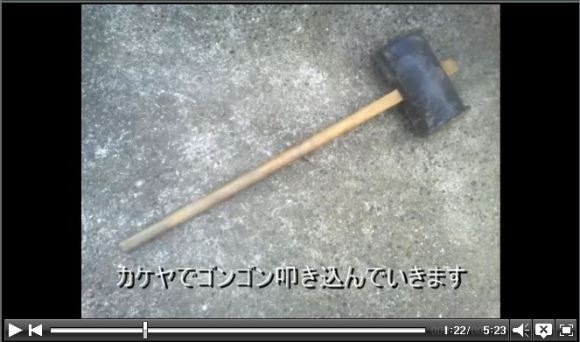
▼Begin to hammer it into the ground with a mallet.
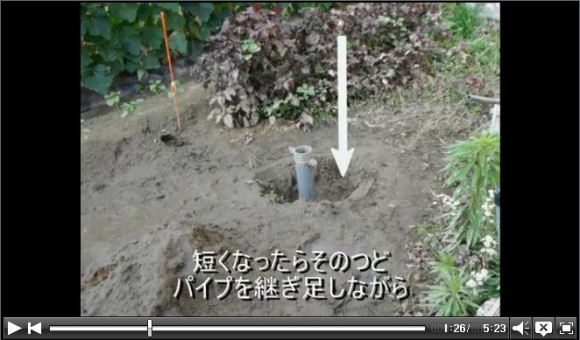
▼Whenever the pipe becomes short while you are driving it in…
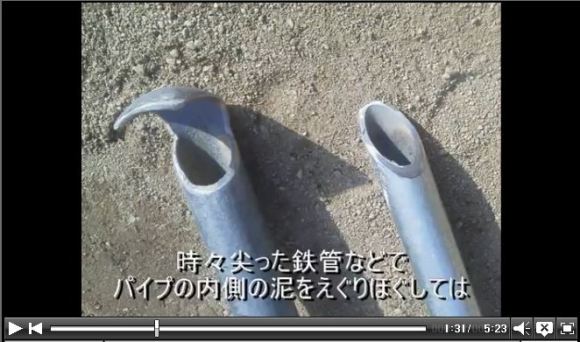
▼…remember to sometimes scoop out the mud inside the pipe with a pointed iron pipe or something similar.
▼Collect the water in some kind of container on the earth’s surface.
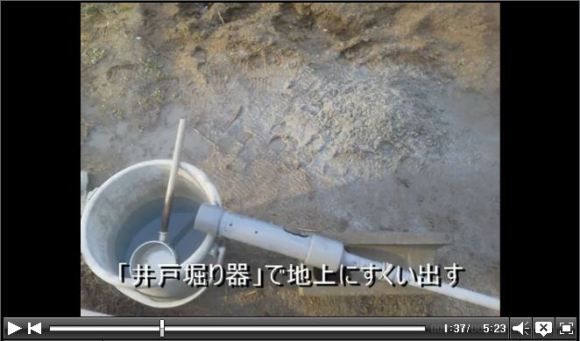
Repeat this action many times. Drive the pipe further and further in until water appears.
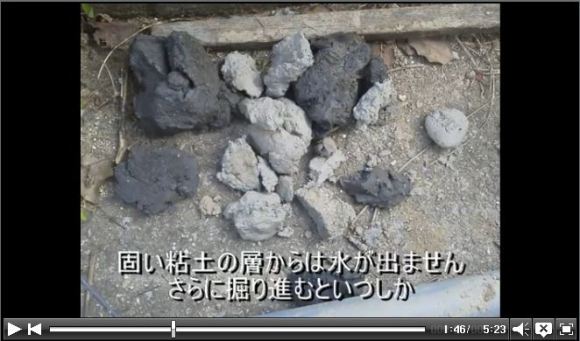
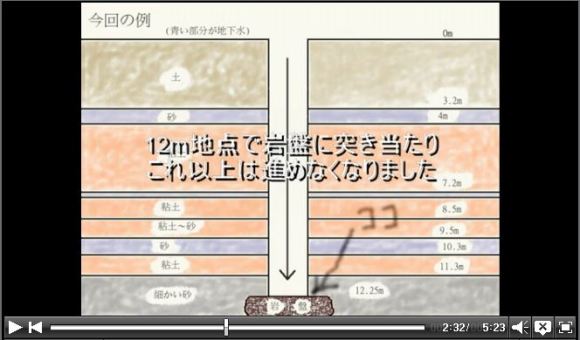
▼You won’t find water at the layer of hard clay. Continue digging deeper, and before you know it…
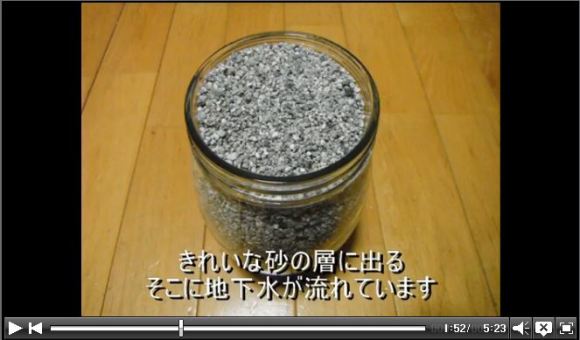
▼…you will reach a layer of beautiful sand. Underground water is flowing there.
▼You should anchor the end of the pipe precisely in this permeable layer.
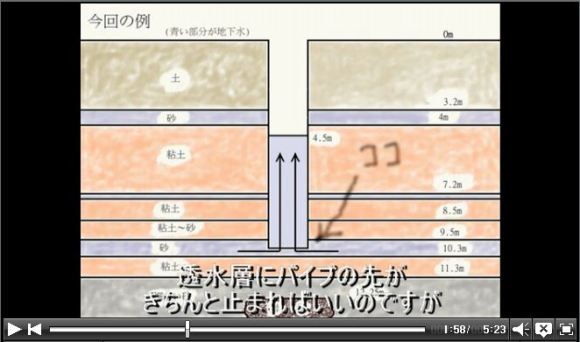
▼If you carelessly pound it too far, you may go beyond the sand layer by mistake.
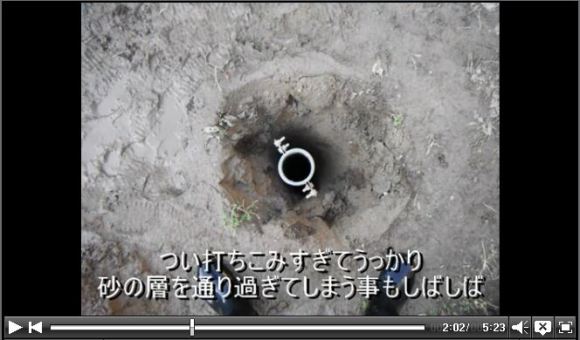
▼If you have really bad luck, even if you dig and dig you will only find the clay layer.
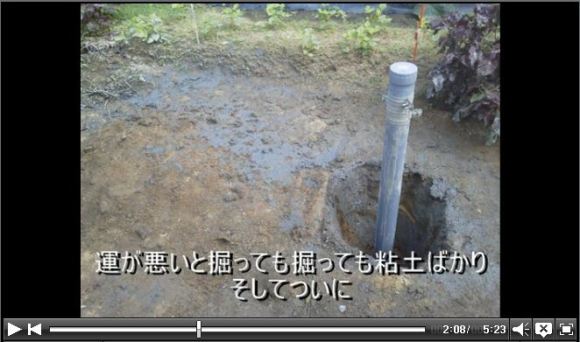
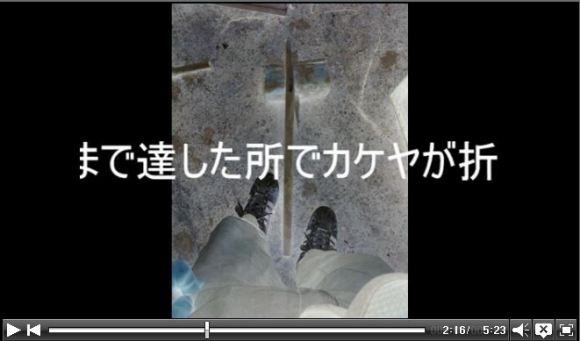
▼When I reached a depth of 7.5 meters, my mallet broke.
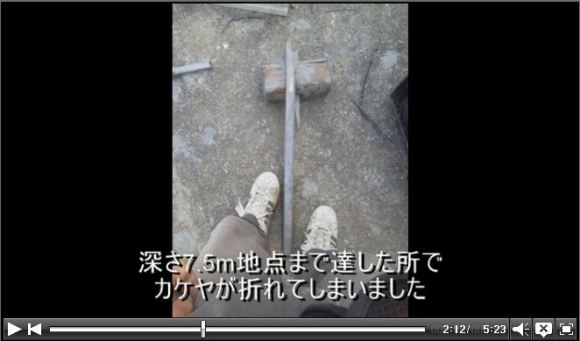
▼MY MALLET BROKE!!
This setback came only nine days after beginning the ordeal. After recovering for half a year, I resumed the excavation operation.
▼It was great to rest and get a fresh start. I was once again making progress, but…
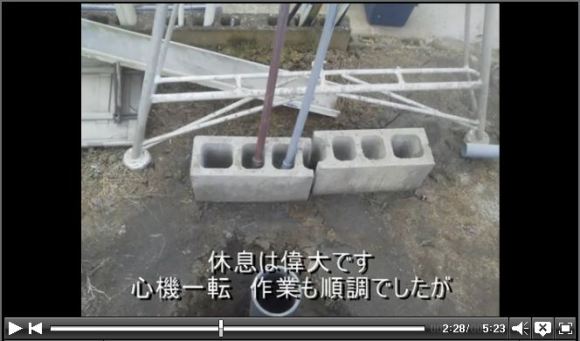
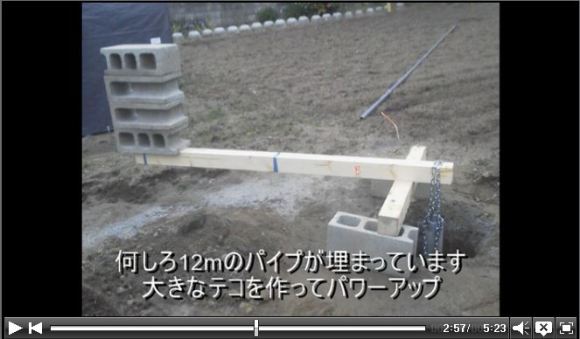
▼…at a depth of 12 meters, I hit bedrock and couldn’t go any further.
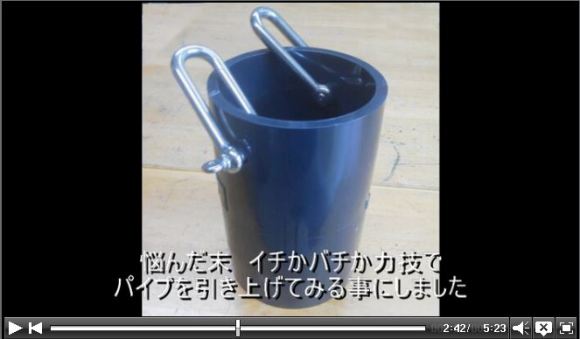
▼I tried pumping water for the heck of it but nothing came out.

▼After debating for a bit, I was so desperate that I tried to pull up the pipe with my bare strength.
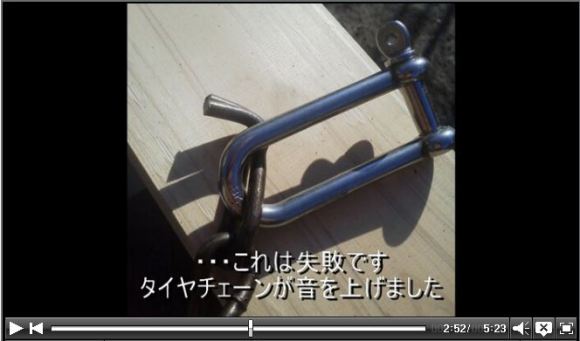
▼I even tried to use a wheel jack and an old tire chain.
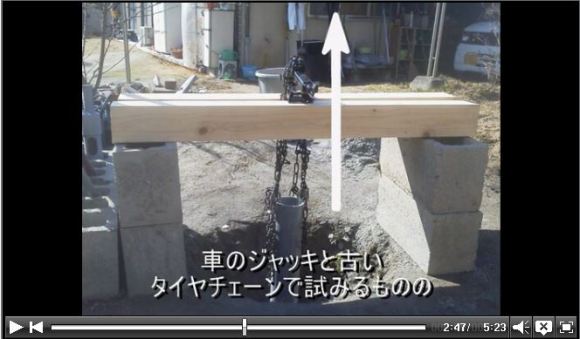
▼…It was a failure. The tire chain gave up on me.
▼Anyway, the 12-meter pipe was still stuck. I powered up by constructing a big lever.
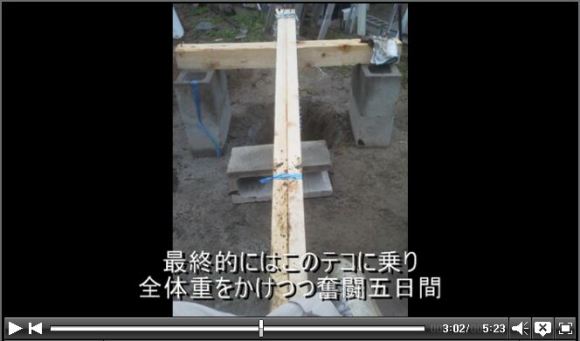
▼In the end, I spent five days struggling to raise the pipe using the lever and all my strength.
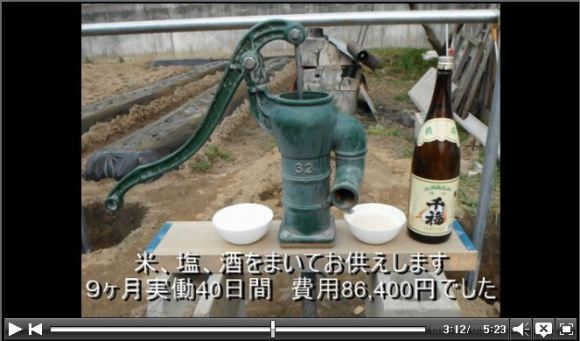
▼Finally, success after managing to pull it up 2 meters! Underground water happily gurgled out of the pump.
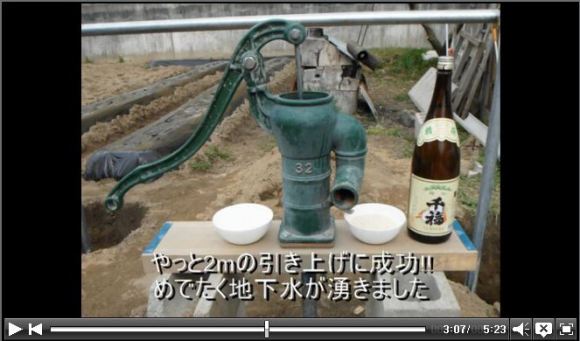
▼In thanks, I prepared an offering of rice, salt, and sake. It took nine months and 40 days of actual labor. The total expenses were 86,400 yen (US$846.72).
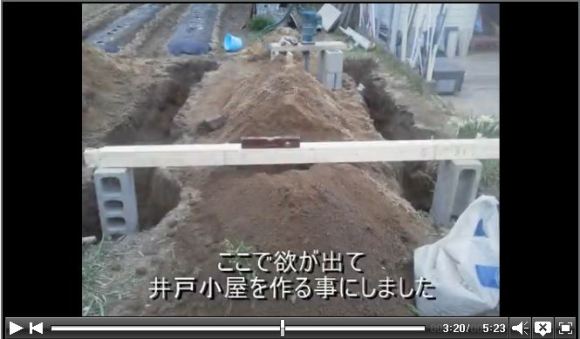
▼But then I became ambitious, and decided to build a little hut for the well.
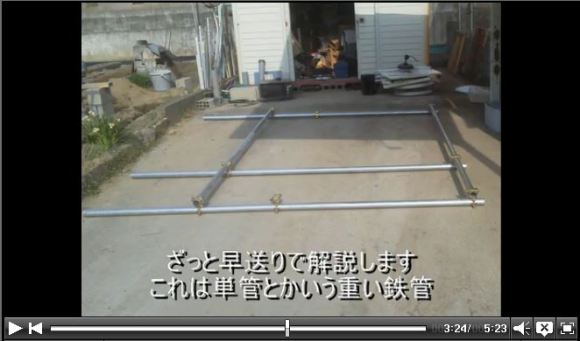
▼I’ll speed up my explanation. Here are heavy iron pipes for the basic structure.
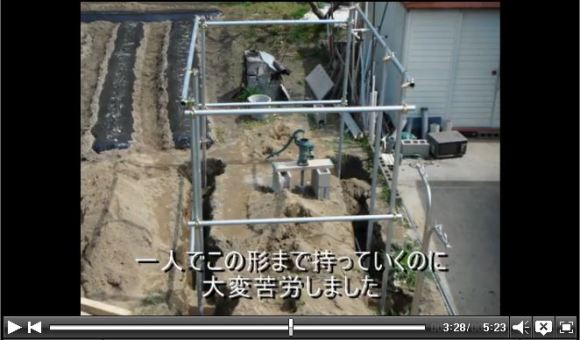
▼I worked really hard to make this shape by myself.
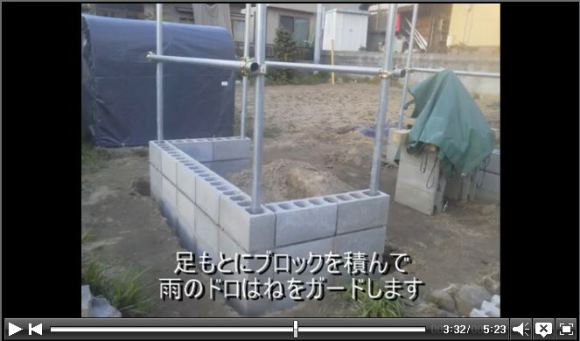
▼I stacked cinder blocks at the base of the structure to protect it from mud on rainy days.
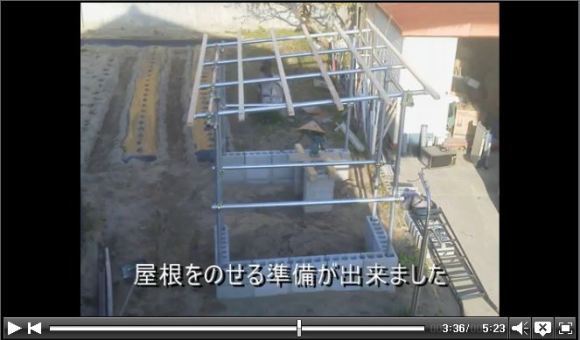
▼The roof preparations are done.
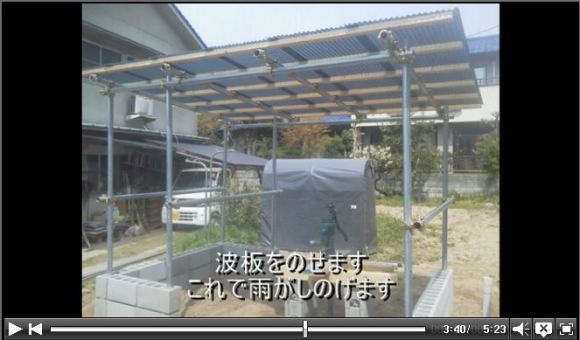
▼I placed corrugated metal sheets on the roof. They will keep out the rain.
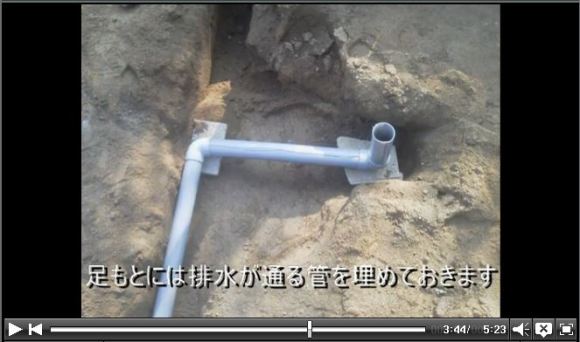
▼I also installed a drainage pipe in the ground.
▼I began to construct a vertical faucet.
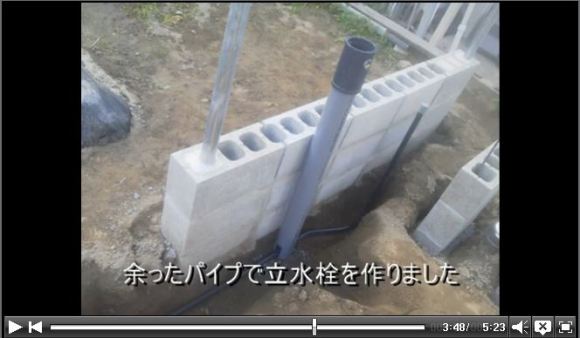
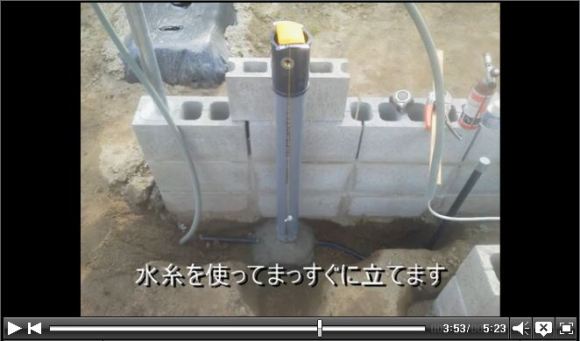
▼Utilizing the water system, it stands vertically.
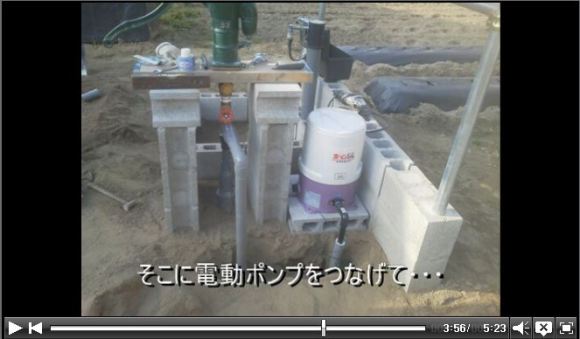
▼Attach an electric pump there…
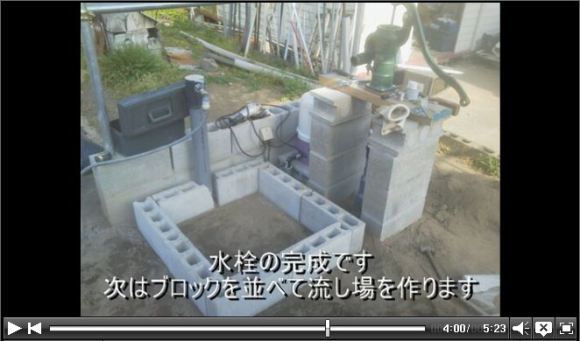
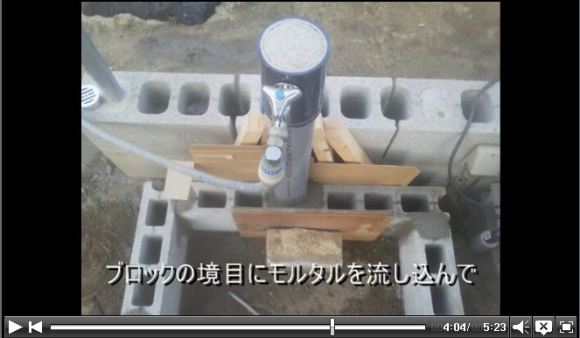
▼…and the faucet is completed. Next, I lined up the cinder blocks to make a drainage area.
▼I poured mortar into the cracks between the blocks.
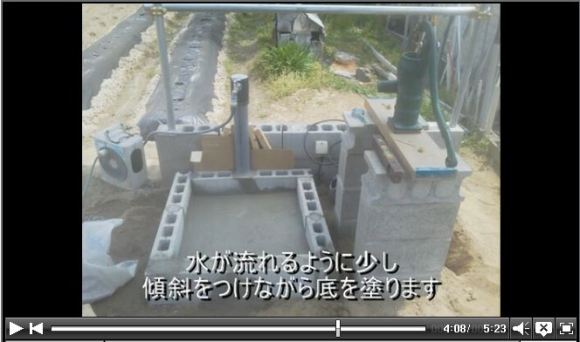
▼I filled in the bottom with a bit of a slant so that water could flow easily.
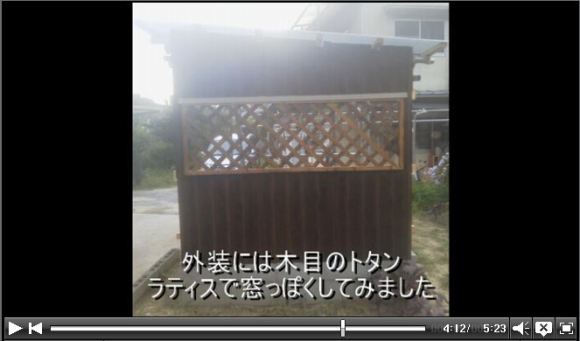
▼I covered the exterior with wooden boards and tried to make a latticed window.
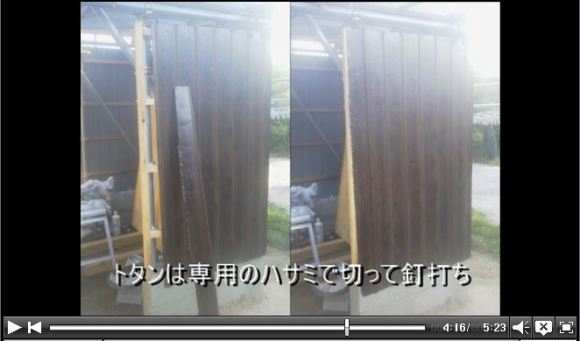
▼I cut the wooden planks by myself and nailed them together.
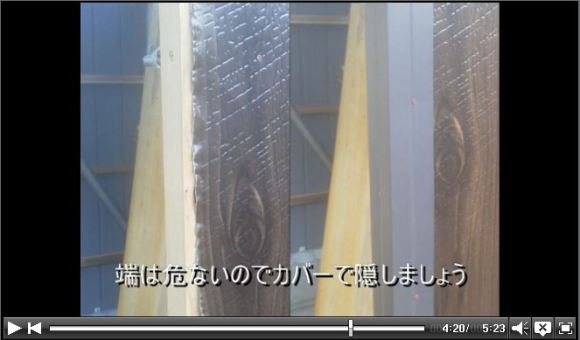
▼The edges are dangerous so let’s cover them up.
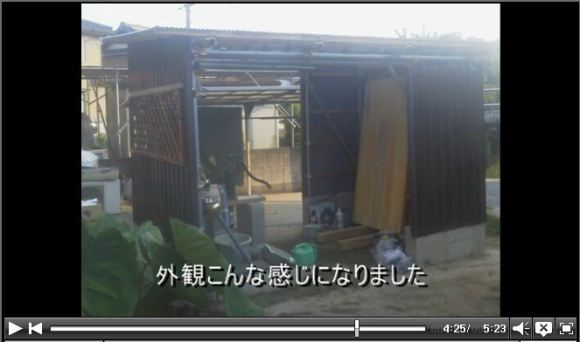
▼This is what the hut looks like from the outside.
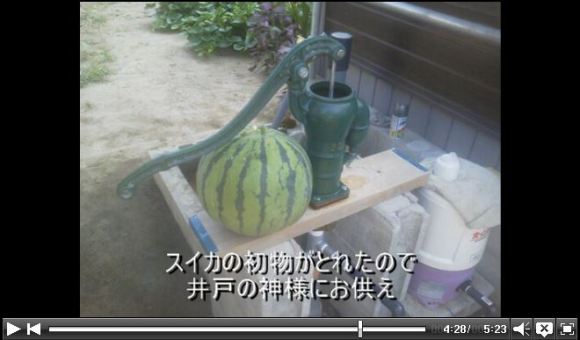
▼I picked the first watermelon of the season to make an offering to the kami (god) of the well.
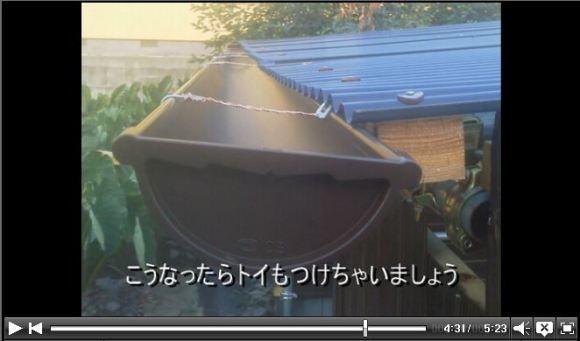
▼Might as well add a gutter, too.
▼A small stone walkway adds the finishing touch.
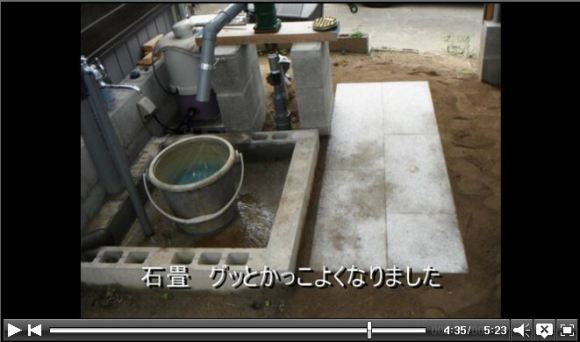
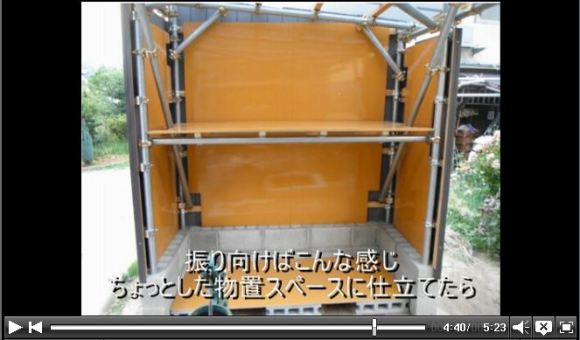
▼It looks like this if you turn around. I prepared a little storage area.
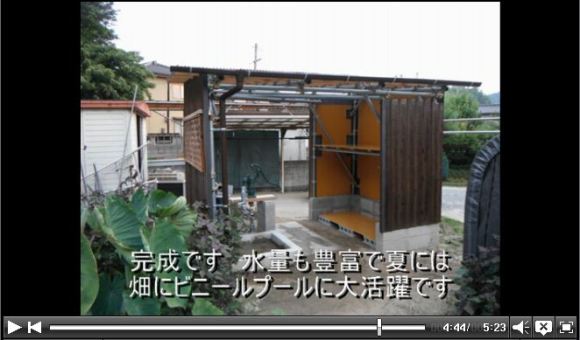
▼It’s complete. There’s plenty of water in the summer. I use it a lot for a plastic pool in the garden.
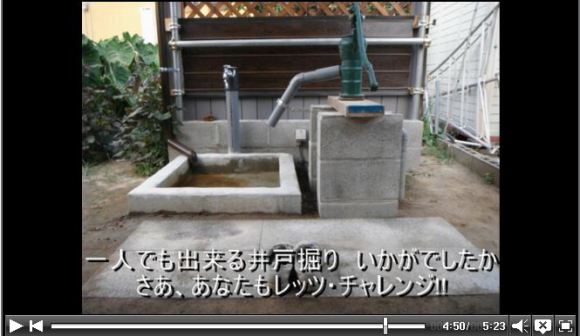
▼So how was all this “digging a well by yourself” business? You too should “let’s challenge [sic]“!
…And there you have it. Okay, who’s ready to go dig up your backyard now?!
Source/Images: Yahoo! Japan
 Crazy-cheap Japanese apartment for less than 140 bucks a month comes with headaches every day
 W.T.F. Japan: Top 5 Japanese autumn foods 【Well-Fed Top Five】
 Man vs. Steak: We band together to eat 4.5 kilograms of beef at Ikinari Steak
 Steampunk vending machines appear in Japan, and here’s how to find them
 Foreign tourists in Japan eat far more rice than previously thought, according to new data
 JR releases prediction of peak Shinkansen crowdedness for Japan’s Obon travel season
 Starbucks Japan unveils exclusive new Frappuccinos limited to three regional areas
 Life-size Legendary Pokémon Mega Rayquaza digitally greeting travelers at Tokyo train station [Vid]
 Maximum entry fee for sento public baths in Tokyo increases slightly for adults next month
 Starbucks Japan releases new “Afterword” collection that gives coffee waste a second life
 Japan has a maid hotel you can stay in, and it’s now taking reservation applications
 Official Final Fantasy beers are going on sale in Tokyo this month, giant Aetheryte appearing too
 Tokyo subway installing new ticket gates that don’t accept payment through Suica or other IC cards
 New Shinkansen luggage drop-off system begins in Japan, making train travel even easier
 Japanese Shinkansen becomes an overnight hotel for three nights this summer
 99-year-old woman rescued while attempting to climb Mt. Fuji
 Which country’s foreign tourists spend the most money per-person in Japan? Hint: Not the U..S. or China
 Starbucks Japan releases a miniature display rack so you can create your very own store at home
 Giant Evangelion Spear of Longinus to be installed at Japanese train station with Eva art trains
 Face lettuce appears in Japan, with the face of Death Note’s Light Yagami, but why?
 Starbucks Japan adds a new summer Frappuccino to the menu, but is it as refreshing as it looks?
 Studio Ghibli has a new anime out, and there’s only one place in the world where you can see it
 Salomon releases Japan-exclusive Mt. Fuji hiking gear that doubles as an amazing souvenir
 Japan now has human refrigerators inspired by Japanese vending machines
 Hatsune Miku collaborates with Hokusai’s art in new Vocaloid ukiyo-e illustration series [Pics]
 Japan triples departure tax, foreign tourists and locals now must pay more to leave country
 Studio Ghibli releases anime T-shirts that pay homage to one of Hayao Miyazaki’s most personal films
 Family Mart opens new “Famima” flagship store in Tokyo that’s like a tourist attraction
 Sanrio Character Poll announces winners, Hello Kitty absent from top 10 in many countries
 Japan announces sudden 400-percent increase in visa fees for foreigners entering the country
 Japan’s human washing machines will go on sale to general public, demos to be held in Tokyo
 Starbucks Japan releases new drinkware and goods for Valentine’s Day
 Starbucks Japan releases new sakura goods and drinkware for cherry blossom season 2026
 Japan’s newest Shinkansen has no seats…or passengers [Video]
 Japanese ninja certification exam attracts 131 candidates from Japan and abroad
 Put sesame oil in your coffee? Japanese maker says it’s the best way to start your day【Taste test】